Road bike interview guide
In this Article
- 1. Wash your bike correctly
- 2. Check the wear status of your channel
- 3. Lubricate your channel
- 4. Inspect your tires and rims to detect cuts or wear traces
- 5. Inflate your tires correctly
- 6. Check the other key components: brakes, steering game and speeds
- 7. Store your bike inside
- 8. If you have a doubt, take your bike to your mechanic!
- 9. The 5 maintenance errors not to be done
- 10. Conclusion
Posted on May 30, 2022
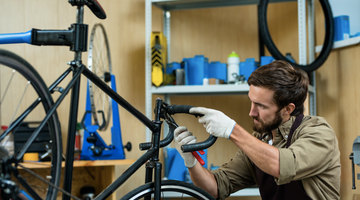
The maintenance of your road bike may seem intimidating or tedious, but it can actually be fun and rewarding. With a few tools and a regular routine, it is quite simple to keep your road bike in good working order. In addition, if you plan to sell your bike, this guide will allow you to maximize its value. Here's how to do it.
For mountain biking followers, go to our Maintenance guide for beginnersFor dedicated advice.
Buy our reconditioned road bikes.
Wash your bike correctly
No one wants to tackle their bikes after an outing, especially if it was cold, humid or muddy, but cleaning will greatly help preserve your bike. Even if the exit was dry and dusty, a bicycle washing should be part of your routine almost every two weeks.
This is what you will need to effectively clean your road bike:
- Bike soap - 24.60 € (you don't need something extraordinary!)
- Degreasing - 14.40€
- Bucket - 10.99€
- Sponge - 2.30€
- Chain cleaning brush – 16.10€
- Lubricant for bicycle chain (see our recommendations below).

A variety of brushes helps you clean all the corners and corners of your bike.
Before wetting anything, start by degrading the chain. A spray degreaser (like bike hardcore or muc-off) works very well. Divide the product abundantly over the chain, cassette and trays, then let stand.
Then fill your bucket with hot and soapy water. Start at the top of the bike and go down. Rub all the bike with your sponge. If the frame is particularly dirty, remove the wheels and wipe the landslides from the fork and the bases of the chain. Be meticulous and also rub the rims, hubs, rays and tires. Maintenance of carbon or aluminum frames remains comparable, read our guide to better understand the differences between these two materials.
Now back to transmission. On your cassette, you will probably need to use a rigid brush so that the degreaser works well. After rubbing, rinse everything with soapy water. It is useful to have your chain in the large ring while you clean everything in depth, paying particular attention to all the components. If they need to be recurred more, take out the long hair brush.
A hard -haired brush is essential to eliminate the dirt from the cassette.
It is not compulsory, but a chain cleaner like that of Park Tool makes work much easier.
Finally, slightly sprinkle the bike with a watering pipe to gently rinse the remains of soap. If you do not have a watering pipe, a universal spray is an excellent alternative. Avoid sprinkling the bearings directly (that is to say the hubs, the crankset and the transmission) with a high pressure pipe. It is also advisable to dry everything carefully - it is not recommended to leave a wet bicycle. When your bike is completely dry, lubricate your channel (see below) and, after letting it stand for a while, wipe the excess lubricant.
Important gesture for the environment, remember to collect the products you use so as to bring them to the nearest recycling center.
Buy our reconditioned road bikes.
Check the wear status of your channel
It is easy and quick to check the wear of your channel - why not do it more often?
It is useful to note the number of kilometers traveled by a chain, at least approximately, especially if you drive a lot. Depending on your practice, a road bike chain lasts about a season, which can represent between 1,000 and 3,000 kilometers. But better than guess, it is best to check the wear of your channel using one of these tools:
- Silverline chain wear indicator - 8.30€
- Topeak chain wear indicator - 8.45€
-
Pedro chain wear indicator - 20.90€
Lubricate your channel
Even if you only wash your bike once a month, make sure your channel is well lubricated. It is advisable to find a lubricant for chain adapted to your region. There are lubricants for chains for humid, dry and mixed climatic conditions. Lubricating your chain not only allows it to be kept in good working order, but also to preserve the rest of the transmission, including derailleurs.
Expert advice : Apply the lubricant for chain at the level of the derailleur's lower pulley to minimize the projections on the cassette.
Read our complete guide on bicycle channels and the lubricant for chains.
Here are some of our favorite lubricants:
- Squirt chain lube – 9,30€
- Zefal Pro Wet Lube (for wet conditions) - € 4.95
- Zefal Extra Dry – 5,99€
- Muc-off wet lube (for wet conditions) - € 5.95
-
Muc-off dry lube - 8,84€
Inspect your tires and rims to detect cuts or wear traces
A quick tire verification is always judicious, but it is particularly useful if you have noticed a deflation of your tires. Slowly rotate each wheel and examine the tire bearing strip in search of thorns, glass shards, cuts or debris. Also check the sides to make sure there are no cuts. When you assess the sides of the tires, look at both sides of your rims to make sure that there are no cuts or bumps that could alter the structural integrity of the wheel. If your rims are made of aluminum, watch the bumps. If they are carbon, pay attention to cracks. Fortunately, unless you drive on very damaged roads, these problems are rare on road bikes.
Even if there is no immediate problem, it is good to note the wear of your tires. Certain road tires, such as those of Specialized and Continental, have wear indicators - generally small circular indentations in the middle of the bearing strip. When the bearing strip wears out to the point of making these notches disappear, it is time to replace the tires. The light racing tires wear out (and roll) faster. Roaring road surfaces and lower tire pressure can also cause faster wear.
Inflate your tires correctly
Always check the pressure of your tires before each outlet. If you drive every day, it may seem excessive, but you never know when you are going to drive on something that can die. It is not because you have returned without problem the day before that you have not lost pressure during the night.
Read our full article on tire pressure.
Check the other key components: brakes, steering game and speeds
You don't need to be a professional mechanic, but you should keep an eye on the proper functioning of your bike. If something seems abnormal to you, there is a risk that it will be.
Check your brakes
Run each tire and pull on the corresponding brake. The lever race (how long until you feel a resistance) constant? Is it firm? Note if something rubs or if you have the impression that it takes more effort than usual to pull the levers. Purge or replace the cables and cache if necessary. Check the wear of the brake pads - be a little detective. If the platelets of your disc brakes measure only three millimeters or less, replace them. For rim brakes, plates rubber generally has grooves. When these patterns have disappeared or the brochure reaches a marked limit line, it is time to replace them.
To learn all about the brakes of your bike, read our dedicated guide.
Make sure the bolts and nuts are tight
Over time, vibrations can cause certain bolts to loosen. It is wise to carry out periodic checks, but always use a dynamometric key!
Every two or three months, it is wise to ensure that the main bindings of your bike are properly tight. Do not just trust the touch. Use a dynamometric key and follow the manufacturers' specifications of the components (generally printed on each room). We recommend that you check:
- The tightening bolts of the handlebars
- Frame tightening bolts
- The bolts of the seatpost
- Through axes (if applicable)
Calibrate your derailleurs
Place your bike on a crutch or ask a friend to hold the rear wheel above the ground. While pedaling, pass all the speeds to make sure that there is no jump or hesitation in the speed change. A correctly calibrated rear derailleur goes up and down the cassette with the same ease. This can be adjusted using the barrel adjustment device on the derailleur, which adds or removes cable voltage. To improve downshifts (switch to larger gables), turn the barrel in the opposite direction to the needles of a watch to increase cable tension. To improve upper gear passages (going to smaller gables), turn the barrel clockwise to reduce cable tension.
If you have trouble setting up your speed changes or if your gear lever is heavy, your cables are probably damaged. Always replace the cables and the box together. The case can hold the dirt and it is useless to do the work half. Unless you drive in extremely humid conditions, the cables and the case must generally be replaced once a year. If you have an electronic speed change system, no maintenance is necessary, if not loading the battery when it is low.
Check the steering game
If your bike makes a rattling noise when you bounce it (gently!) On the ground, the steering game may be loosened. This problem can also manifest itself by a feeling of knocking during sudden braking. The management games loosened are rather rare these days, but as with all these controls, it is better to detect problems in time before they cause problems.
Know which components should be replaced
The chains, trays and cassettes all wear out together. If you regularly replace your channel and keep it clean and lubricated, you will not have to worry about the wear of the transmission. However, if a new chain yields under the load, or if you notice that your pedaling is irregular or noisy, your trays are probably worn. Likewise, if the teeth of your tray or your cassette are starting to look like shark fins, they are probably worn.
Buy our reconditioned road bikes.
Store your bike inside
You use your bike in all kinds of conditions, so why is it important that it sleeps inside?
Even if it takes time, temperature variations, frost, sand and humidity will slowly corrode and damage the bike. To extend the lifespan of your bike and its rooms, keep it inside and dry. It is also much less tempting for thieves!
If you have a doubt, take your bike to your mechanic!
Even with regular cleaning, basic home maintenance and bicycle routine checks, it is better to obtain a professional development each year - or each season, depending on the frequency of your trips. A bicycle store can detect elements that have escaped you or suggest solutions to avoid future problems. In addition, it is good to have a friend at the local cycle store.
The 5 maintenance errors not to be done
If you should only remember part of this article, it is undoubtedly this section. The five maintenance errors below can cost you dearly-so take care not to do them! Also, if you consider the purchase of a used bike, our article "5 frequent errors and how to avoid them"is a must!
1. Mainly maintain its transmission
Never regret a chain or a dirty cassette. Clean your bike as described in our article above, dry it well and then regret with a suitable lubricant.
- Degrease without paying attention:Beware of bearings, discs, brake pads that do not appreciate the product at all, be meticulous and only degrease your chain.
- Poorly choose your lubricant:Choose products specific to your channel; Olive oil is not a good option!
If you hesitate which transmission to choose, we review the differences between Electrical and mechanical transmission.
2. Poorly inflate your tires or inspect your tires in the event of a puncture
- You will have to force twice as much to move as fast as with swollen tires.
- Your tires will wear out much faster because the ground support surface will be greater and the tire will work more and will wear out much faster.
- In the event of a hole or pebble, you risk damaging your rim, and for the carbon rims, the bill may be salty!
- If you create, check your tire correctly and remove thorns, glass ends, screws ...
- Do not hurry up and be meticulous. Otherwise, you will recreate almost immediately and you will no longer have an emergency air chamber.
3. Tighten the screws and nuts too hard your bike
- Have tools in good condition - a tired tool, will also tire the screw or the nut of your bike.
- If you use a dynamometric key, check the manufacturer's instructions well on the Newtons to be tightened, if you are too strong, you risk breaking the screw or the nut.
4. Do not settle the limits of your derailleurs well
- Badly adjusted front derailleur: the chain may go on the shelves.
- Malt adjusted rear derailleur: The chain may leave between the gables and the frame and you will sand your frame.
5. Clean your bike with pressure water
- Neither the bearings, nor the cables, nor almost no other part of our bicycle will thank you for having applied an intense water jet to them. On the contrary.
- Use the traditional but effective damp cloth, then dry each part with another dry cloth. It will take more time, but you will take care of all the components as they deserve.
Conclusion
Of course, riding with your bike is the most fun part. But it is also satisfactory to keep things in good working order, and to know your bike from every angle. Lavages and regular inspections are the simplest means to make sure that your bike does not have a hidden concern that could turn into a more important problem. Read our Buying guide for road bikes For more details on things to check before buying.
At The Cyclist House, we check and meticulously resets all the bikes passing by with us. We carry out a Revision and development in 114 points On each bike we sell. So you know that when your new bike arrives, you will be ready to ride with it. We want you to know how to maintain your bike so that you can continue to make the most of it. Enjoy the time spent in your garage - after all, it's part of the adventure.


